Introduction
Priority can integrate with several different email services for sending emails, both internally between Priority users and externally to customers, vendors, leads, etc.
There are three options for configuring email in the system:
- Direct integration with Gmail/Office 365 using OAuth.
- By connecting to Microsoft Outlook installed on the workstation.
- Generic connection to a mail server using SMTP.
This document explains how to configure email for each of these options.
Keep in mind that defining email again will replace the previous defintion - if you define email with Outlook after defining email with Gmail, your Gmail settings will be erased and mails will no longer be sent via Gmail.
Set Up Mail Using Gmail/Office 365
Sign Up to Priority Connect
The connection to Gmail/Office 365 uses OAuth2, which requires that you first sign up to Priority Connect.
Alternatively, you can connect to Gmail or Office 365 with a generic SMTP connection, via app passwords. For Gmail specific instructions, see here.
Setting Up the Connection
- Log in to the relevant service - Gmail or Office 365 - on the workstation.
- In Priority, from the Options Menu, click Mail and select Mail Options > Gmail/Office 365 > Mail Settings.
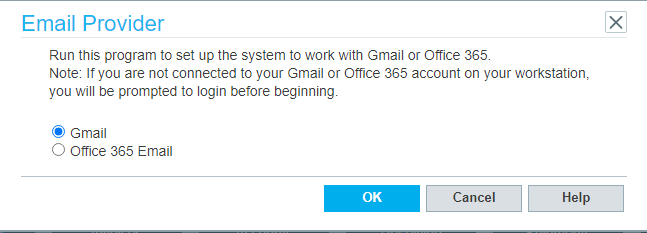
- Select your email service in the window that opens.

- A new browser tab opens with the request from Priority to access the mailbox. Authorize it.
- An OK message appears, which means you can return to Priority.
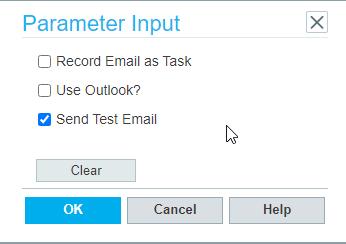
- When you return to Priority, the following Window opens:

- Select the Record Email as Task option to have each email that you send to a customer or vendor recorded in the system as a marketing task, searchable in the Tasks form.
Note: The system administrator can use the MAILCRM constant (in the System Constants form) to configure this option for user groups or all users in the system.
- Select the Use Outlook option in order to send and receive messages using Outlook.
- Select the Send Test Message option to have the system send a test message to the connected account.
- Click OK to finish the setup process.
Result: The Priority account is now connected to the selected email service.
Set Up Mail Using Outlook
Important: To work with Outlook, the Priority Plugin must be installed. The option to use Outlook will not appear in the Mail menu if the plugin is not installed.
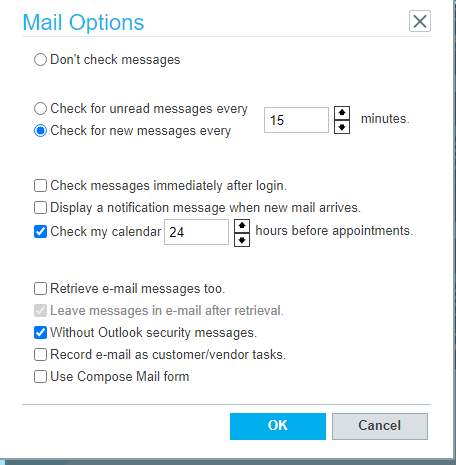
- In Priority, from the Options Menu, click Mail and select Mail Options > Outlook > Mail Options. The following window appears:

- You can determine the frequency the system checks with Outlook for new messages:
- If you do not want any automatic checking or notification of new/unread mail, simply select the Don’t check messages option.
- If you do want automatic notifications, select either Check for new messages or Check for unread messages and specify a frequency in minutes (defaults to 15 minutes).
- If you selected to check messages, you can fine tune the behavior:
- Select whether you want the system to check for mail immediately upon logging in with the Check messages immediately after login.
- Select whether to receive notification messages of new/unread messages with Display a notification message when new mail arrives.
- Determine the frequency of checking the Outlook calendar.
- The next few options are related to integrating Outlook with Priority’s internal email forms:
- If you want email messages to be retrieved to Priority’s internal inbox, select Retrieve e-mail messages too. This will open up the option to leave the messages in Outlook after retrieval.
- Select Without Outlook security messages to hide messages related to sending messages to a large number of addresses (e.g. when sending emails to a group of leads).
- Select the Record Email as Task option to have each email that you send to a customer or vendor recorded in the system as a marketing task, searchable in the Tasks form.
Note: The system administrator can use the MAILCRM constant (in the System Constants form) to configure this option for user groups or all users in the system.
- By default, once Outlook integration is set up, clicking an email address opens the new mail dialog in Outlook. To have it open Priority’s Compose Mail form instead, select the Use Compose Mail form option.
- Click OK to finish setting up email with Outlook.
Result: The Priority account is now connected to Microsoft Outlook on the workstation.
Set Up Mail Using Other Servers
- Open the Mail Servers form.
- Record an easy to identify Mail Server Name
- Fill in the Mail Server Address, Domain (if necessary), and SMTP Port. This information should be provided by your mail server provider.
- Select the SSL and TLS checkboxes.
Run Setup Program
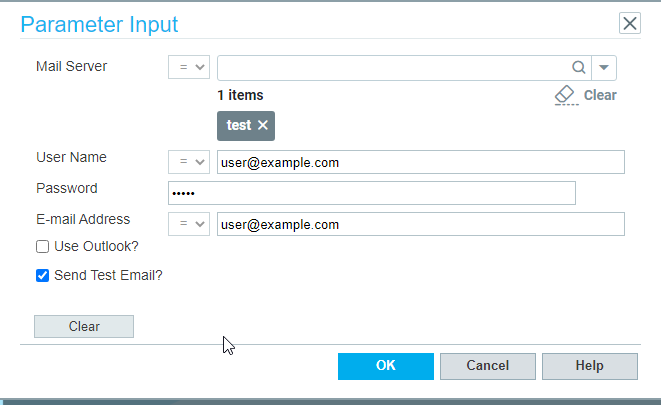
- From the Options Menu, click Mail and select Mail Options > Other Servers. The following window appears:

- In Mail Server, select the mail server you previously configured.
- Fill in the username, password, and email address on the mail server.
- Select the Use Outlook option in order to send and receive messages using Outlook.
- Select the Send Test Message option to have the system send a test message to the connected account
- Click OK to finish the setup process.
Result: The Priority account is now connected to the relevant account in the mail server.


